Don’t just send the little girls and tweens in your life back to school. Send them back to the ’80s with a craft kit full of supplies to whip up three of the decade’s most iconic accessories: ribbon barrettes, friendship bracelets and friendship pins.

Admittedly, those barrettes wrapped with colour ribbons that dangled off the ends never stayed very well in my thin hair, but I made and wore them all the same. I had better luck with the bracelets and pins, which I remember trading with pals and wearing on my shoelaces in fourth or fifth grade.
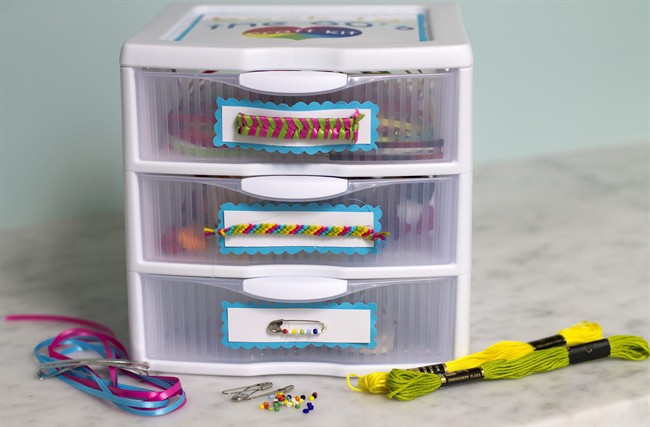
This is a great project if you want to give a homemade gift but don’t have much time to actually make anything. Just collect the supplies, print out some directions and pop them into a cute organizer. With just a little extra effort, you can dress it up by decorating the container with samples of the finished projects.
MATERIALS:
- 1/8-inch satin ribbon in assorted colours
- double-bar barrettes
- embroidery thread in assorted colours
- scissors
- tape
- safety pins, preferably coil-less pins
- seed beads in assorted colours
- small, three-drawer container (mine came from Target.)
- cardstock
- hot glue gun, glue
INSTRUCTIONS:
1. For barrettes, cut ribbon into 1-yard lengths and place in one of the drawers along with the barrettes. To make a sample, open the barrette, and slide in two ribbons, so the midpoint of the ribbons are at the clasp end of the barrette. Take one end of the first ribbon and poke it through the slot in the middle of the barrette and pull it to the outside. Do the same with the other end, so the ribbon is crossed in the centre of the barrette. Do the same with the second colour, weaving both ends through the bars of the barrette. Repeat until you reach the end, and then tie a double knot to secure. If you want to print out instructions with photos, there is an easy-to-follow tutorial (http://bit.ly/XhNDCG) online at Hip Girl Boutique, which also sells the supplies.
2. For the bracelets, just pile about a dozen skeins of embroidery thread into the second drawer, along with a roll of masking tape and a small pair of scissors. (The tape can be used to hold a bracelet in place on a table while it is in progress.) For instructions, the website friendship-bracelets.net has hundreds of patterns and tutorials.
3. For the pins, you have two choices. Regular safety pins can be used if the pins will be worn on shoelaces, but it can be difficult to pin them to clothing if the beads are on the arm of the pin that opens. The coils can be pried apart to slide the beads onto the other side of the pin, but the easiest option is to simply use pins that don’t have coils. These can be found with jewelry-making supplies at craft stores. No instructions are necessary for this drawer: Kids can figure out how to place beads on the pins!
4. To decorate the box, make a sample of each project: a barrette, a short length of bracelet and a pin. Hot glue each item to a small rectangle of cardstock and glue the cardstock onto the drawer fronts as a “label” that advertises the drawer’s contents.
5. Decorate the top of the box with a large cardstock label that says “Back to the 80’s Craft Kit.” You can download my design here.
Comments